It's so bittersweet. On one hand I can take a breather from all the intensity of the birthdays and Christmas. But it's my favorite time of the year and I miss is so much when it's gone. If you didn't notice I decided to give myself a break on blogging. The 2 AM late nights were getting to me!
I have made a pact with myself. I am going to start prepping for Christmas in the summer!!! Because after that it's birthday season for all the nieces and nephews then it's our household birthday season and then BAM it's Christmas. Then I hide under the covers for a few days sleep in and bribe the kids with leftover christmas candy to play nice and give mommy just a few more minutes. HA! No not me... I wouldn't do something like that!
But the season isn't over yet! We still have New Years - a time to reflect on the year, count our blessings and give ourselves a break before we do it all over again!
Take it easy and remember how blessed you are this year. It's been a hard year for us but man we have so much to be thankful for.
Here's your little New Year's present from me. Enjoy.

Thursday, December 29, 2011
Thursday, December 8, 2011
Holiday Hustle: Kid's Christmas Ornament

The activity on our advent calendar yesterday was for us to make an ornament together. I had a pre-made foam ornament kit that I picked up last year, so that's what we used. Well I ended up doing most of it because it was not kid friendly at all. If you have to use a glue gun to make every single step come together... it is NOT KID FRIENDLY. So out of my frustration I decided to make one of my own that they could have a bigger part in. Enter the popsicle ornament. It's a great staple and there is so much you can do with it. So if you have some popsicle sticks and some yarn you are pretty much set. Here is what you will need for the basic ornament:

**I actually ended up using 4 sticks but you make it how you like it. The yarn is only $1.50 at Michael's this week (by the way) and they have lots of yummy colors.
Start by tying a piece of yarn to one end of the stick and cut off a long string of yarn for your big guy to wrap around it however he likes. Like so:

Have him do that with all three (or four). His attention span may only get him through a few but that's ok just work with them wherever they are. Then tie the end off by looping it through the other strings for him. I left a little space in the middle to make it easier to glue them together. Then glue the sticks together with your glue gun and tie on a little extra yarn for a hanger.

You could stop there if you wanted but I had the perfect little embellishment in my stash so I couldn't help myself. So I glued that on and had him hang it on the tree all by himself. He was so proud and you have an ornament that any mommy would be proud to have on her tree.

Enjoy!
Sunday, December 4, 2011
A Little Tour

Remember that chain that was left on the side of the Trader Joe's bag after you made your fabulous gift tags with me? My oldest and I had the best time putting that chain together and it gave me a teachable moment to talk about pattern and have him help me make sure the pattern was correct on our chain. He loved helping. So I hung it across one wall and used some twine to attach some $1/a pack foam snowflakes that I got from the bargain bin at Target. Gave it just a little added touch that it needed and Corben loved seeing his work on display.

I noticed that my decorating this year is very much a homage to my love of typography. The Joy on the side is actually a sequined table runner I picked up from Target after Christmas for $5 or $6, I think. I used some zots to attach it to the wall, which I also used to attach the chain to the wall also. It's just the right amount of stick. When you want it to stay, it's not coming off the wall but when you are finished, you can get them off your wall with a little effort and (in my experience) no damage to the dry wall.

Next up is my super fast Advent Calendar. A few days late I decided we needed an advent calendar. Corben was already asking me how long until Christmas and I really wanted to make one anyway. So I used the "advent calendar for the procrastinator" (perfect title) from the little red house.


I really enjoyed putting it together and planning all the little things we were going to do for each day. I'll have to share the list with you. But for now I need some sleep!
Hope you enjoyed a mini-tour of some of our holiday decorations.
December is here!
The month of December is especially crazy at our house because it's also the month of my husbands birthday, my oldest son's birthday (4), and my mother-in-laws birthday. Whew! I'm feeling the stress for sure, but trying to not allow that to get in the way of making Christmas magical for my kiddos and take the opportunities to share with them the real reason for the season.
I love Christmas and I especially love decorating and crafting for the holidays. So as I'm doing the "Holiday Hustle" with my family this year, I'm inviting you to come with me! As I'm prepping for birthdays and Christmas by crafting, decorating and making gifts for those dearest to me, I'll be sharing with you along the way.
Corben (my almost 4 year old) wants a Lego Star Wars Party and my husband is turning the big "3 - 0." So I've got some late nights ahead of me to say the least. But until then I'll show you some fun things we've done around the house to decorate with the kids and make the house a little more cheerful with some great budget friendly ideas. I'll be posting that tonight.
Thanks for hanging in there with me and Merry Christmas!
Tuesday, November 29, 2011
Pimp That *Trader Joe's* Bag

I heart Trader Joe's. Since moving close to one I can't keep myself out of there and at least drop $50 everytime I go in! It's my go-to place for organic produce at a great price and just yummy stuff in general.

But lets be honest if we just used them cut out, they would be kinda flimsy. So I decided to pimp my gift tags and give them a little more character and weight with crafty things I had around the house like card stock, yarn, beads, ribbon, embroidery thread, and glitter. If you have this in your arsenal already, you are all set!

First, I cut out the tags that Trader Joe's so nicely provided on their bag. But I didn't use their cut lines, I cut on the outside of them because I thought that would be a great template for some embroidery floss. Then glued them on some black cardstock and cut them back out. I thought they were very pretty with just this added step. So if your not real crafty, you could stop there if you wanted.
If you want a little more pizzaz then pull out your extras and go to town stitching on embroidery floss, using ribbon and yarn for the tag string, sewing on some beads and finishing it off with glitter.
Then here you have it! Some of my favorites:

Gift tags for pretty much nothing. Thanks Trader Joe's! I couldn't have done it without you!
Here's where I'm linking up this week.
Monday, November 28, 2011
New Reading Wall for My Boys

This whole thing started when I saw the awesome idea for gutter shelves on Gus & Lula.
I saw them on Oh Dee Oh a while back but never got around to it. Then the boys' books became such a headache. They were always all over the floor or in a bin or shelf and always getting pulled out or forgotten about because they were put away.
I cannot tell you how magical these shelves are to my children. They just love it! They love going to get books and they love putting them away again!

I fell in love with the bunting that Gus&Lula used and I just happened to have some Ikea fabric in the same print as their bedding lying around. So a little bias tape and a few cuts from my rotary cutter later... voila custom bunting for their room.
I enjoyed making these so much, I may just make some more and put them in my etsy shop. I just love this print, it's perfect for a little boys room.
Then last but not least... I was so inspired by these large scrabble wall tiles from Too Much Time On My Hands that I could not wait to make some of my own to decorate my boys' room with. And what better word to go over a book shelf?
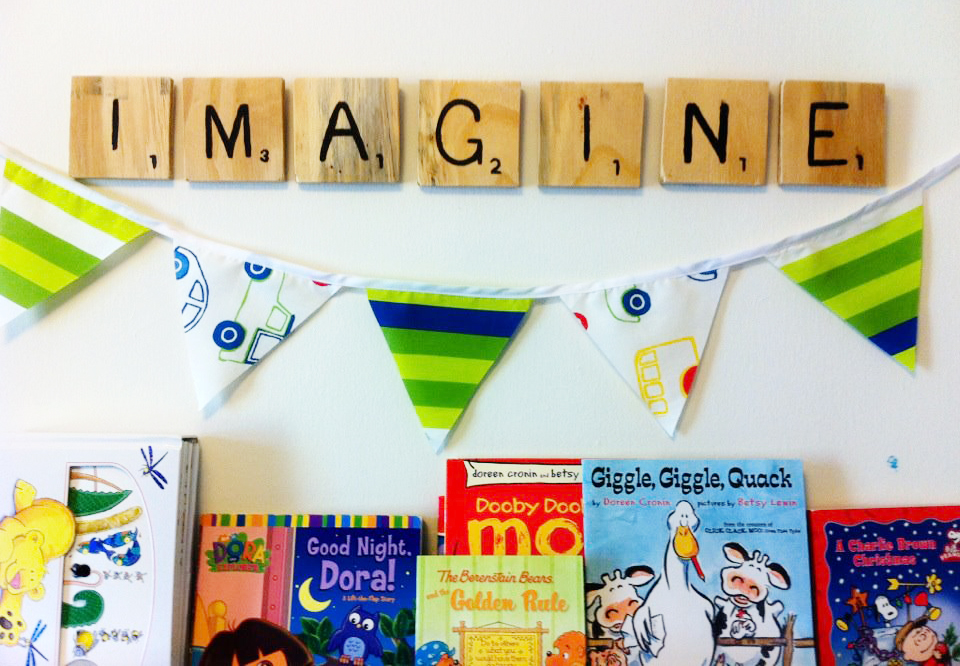
I cut squares from some free wood scraps that I picked up from Home Depot and free-handed the letters while looking at a photo of scrabble tiles. They aren't perfect but I like that. It was made with love (and some time and sweat sprinkled in). So that's what I've been up to. How about you?
I have a new frugal tutorial coming. Hope to finish it before naptime is up!
Here's where I'm linking up this week.
Monday, November 21, 2011
Handmade For My Boy


My boy was also in need of a new scarf so I used the great tutorial over on living with punks as a guide with a few modifications to make it a bit smaller for a four-year-old. He said he wanted a green scarf with red polka dots. Does anyone else have an almost 4 year old that so specific about what he wants? :) So my mommy interpretation is below - green plaid with red buttons for fun. He loved it!

I'll be finishing up a new tutorial to share very soon and hopefully getting photos together of some of the other things I've been doing around the house. I've been a busy bee lately. What have you been working on?
Supplies On The Cheap

This weekend was pretty amazing. I scored some great deals on Saturday and then took the rest of the weekend to spoil my oldest with some handmade goodies.
Look at all that beautiful fabric! As I said on my last post, a fabric warehouse was doing a huge sale on fabric. The picture above is all of the fabric/crafty goodness I got that morning. 10 bolts of fabric and a yard of leather for $10 total!
My next stop was Joanne's. They were having a grand opening and they kept sending me coupons. I ended up having four 50% off one item coupons and they had sales on all the fabrics that I needed to too!
I spent $35 on $70 worth of stuff. And I finally got a rotary cutter! Wow! What was life like without this thing? It's awesome, especially because I cannot cut, much less draw, a straight line to save my life!

It seemed like such a waste to throw them out! Especially when you are on a budget, crafty supplies are not priority - so you use what you have.
So next up I'll share all the spoiling that I did for my big boy this weekend. I love making things for my boys and he was all smiles :)
Thursday, November 17, 2011
Weekend Deals!
 |
| Photo by: cuttlefish via flickr |
Not only is Chick-fil-A doing a free breakfast tomorrow but I have the chance to score some free bolts of fabric on Saturday! Yes FREE!
There is a warehouse getting rid of 8,000 bolts of fabric on Saturday and you can take home up to 3 bolts for free and most of the others are $1! For a whole bolt!
I can't tell you how fast I'm going to tie my shoelaces and run to this place on Saturday morning. Woohoo!
It's like early Black Friday for crafty people!
Then comes the icing on the cake. I know! I feel like a game show host... "and that's not all folks"...this weekend, the very first Joanne's Fabrics in Charlotte is having their grand opening! Ask me if I have 50% off coupons... go ahead ask :)
Can you tell I'm excited?
Over the next few days I'm completing my scrabble tiles and bookshelves in the boys room, sewing a brand new bag (momma's got a brand new BAG!... sorry I had to do it), and I'll share some of my fabulous frugal finds from this weekend.
Tuesday, November 15, 2011
3 Ways to Use Your French Press

Growing up, my parents made coffee like you make tea. No not the process... it actually looked like tea... you could see through it. GASP! I know, I know. Those coffee snobs out there can pick themselves up off of the floor now. It's a sad past but I've come a long way.
Since those dark days, I now own an espresso machine and can froth with the best of those green apron adorned Starbucks baristas. If you want a challenge let me know :) But when I want a good ole dependable cup of coffee I turn to my French press.
As if I wasn't obsessed enough with coffee and all it's glorious processess, I soon found another fabulous concoction: Cold brew iced coffee.
Oh My! You can just imagine the money I've saved from doing my own espresso and iced coffee from home. I rarely patron the local Starbucks, unless I want that coveted "mommy break" that I talked about here.
So here's my quick list of how you can squeeze all the use out of that French press.
1. Delicious hot brewed coffee. Simple and straight forward and you get a wonderful tasting hot coffee every time. Tutorial here.
2. Cold Brew. After reading the tutorial on smitten kitchen on how to cold brew coffee, I thought - why don't I just let this sit in my french press overnight and I have a built in filter. Filter with a cheese cloth or paper towels? Nope... my french press will do it in no time. Then throw the container you poured the coffee in into the fridge and your good to go for several glasses of iced cold goodness.
3. Loose Leaf Hot Tea. I suppose you could do the bagged tea but loose is cheaper and better in my opinion. Just brew it the same way you do the hot coffee.
Who knew the French Press could be so versatile? Makes me fall in love with it even more. That's where you get me... I love it when something is pretty... but OH if it can be functional and versatile at the same time, I am completely in love! Maybe that's where my love affair with Apple came from too... I digress... Happy Tuesday!

Great Minds Think Alike :)
As I was reading some of my favorite blogs this morning, I came across this new post from Too Much Time On My Hands.
Ha! I was actually just thinking about this as a possibility for expanding upon my paint swatch ornament idea. Why couldn't it be garland etc?
I think I'll take a crack at it and share what I come up with.
Great minds think alike huh? LOL
Ha! I was actually just thinking about this as a possibility for expanding upon my paint swatch ornament idea. Why couldn't it be garland etc?
I think I'll take a crack at it and share what I come up with.
Great minds think alike huh? LOL
Monday, November 14, 2011
Paint Swatch Ornaments

I love the weight and sturdiness that it gives and the added bonus is that it makes these pretty cheap to make. I was inspired by a magazine article that used scrapbook paper. You can use scrapbook paper if you want different patterns etc. But I like the simplicity and sturdiness of the paint swatch much better.
So let's get started... this is what you will need:

Use a 2" die cut circle punch to punch out 8 circles (4 of each color) from the swatches. Then fold them all in half with the wrong side out, just like this:

Now use your glue stick to glue the wrong sides together, alternating colors. make sure they are lined up correctly so the back of the swatch does not show at all. Then when you get to your last one, just glue it to the first one. You'll have a beautiful dome shape.

Take some pretty ribbon or string and thread it through. ** The ribbon is a little easier if you put it in the middle before you close the dome together. Tie a knot at the end and on the other side snip the length you want, fold it over and do a slip knot to create the loop you need to hang. You can stop there or go a little bit crazy and add a bow at the top or brush some white glue on the edges and sprinkle it with some glitter. Simple and beautiful. I can't wait to hang these on my tree this year!
So easy! Hope you enjoy making them with me!
Check out where I linked up on my where I like to party page!
Friday, November 11, 2011
Handmade ornaments

Yes it's that time again! ::sigh:: Christmas!
I always feel bad for Thanksgiving every year. It gets the shaft, but you have to prepare for December early right?
I saw an idea for this ornament while perusing the magazine section on a "mommy break." You know what I'm talking about. The time you get to go somewhere by yourself and listen to the beautiful sound of silence as you get to look at whatever you want without the interjections of "Please don't touch that, Stop bothering your brother, stay with mommy please, yes we will get a snack in a minute." And if you are feeling really crazy you'll buy yourself that expensive cup of coffee, not because it's expensive but because you just want to revel in the fact that SOMEONE ELSE served YOU!
Sorry... I'll put my daydreaming aside and get back to reality.
I saw these and I thought it would be a perfect project for the kids to do. So this is the first draft so to speak.
Since this one, they have gotten more intricate with bows and glitter and other little touches I came up with. But there is one more shocking secret to this cutie that I'll share with you next time. :) I love surprises. Next post I'll show you how to make these yourself for almost NOTHING :)
This year's goal is for almost all of our ornaments to be handmade. The kids love crafting so I can't wait to get them in on it! Happy Friday Everybody!
Wednesday, November 9, 2011
Anthropologie Necklace
I've been experimenting with lots of different crafts lately. I'm trying to get a feel of what I really love to create. What really inspires me.
I've realized that working with my hands in general is an inspiring thing. I was especially surprised at how exhilarating it was to saw wood by hand. Maybe the men are on to something? I felt so accomplished after sawing my wood down into squares for my wall tiles for the kid's room. I took great care to sand them and get them ready for a coat of paint and sealer. When you take great care in doing something, you know your heart is really in it. You're not careless, you take the time to notice every detail.
Well I'm not going to share the wall tiles with you quite yet. I'm going to save the big reveal for when they are up on the wall with my new gutter shelves. I can't wait!
So in the meantime I'll share with you a little piece I made myself recently based on an anthropologie necklace. I found the tutorial over at Flamingo Toes.
I had all the materials but I wanted to give it a little bit of my own twist too.
Here is the original necklace from Anthropologie:
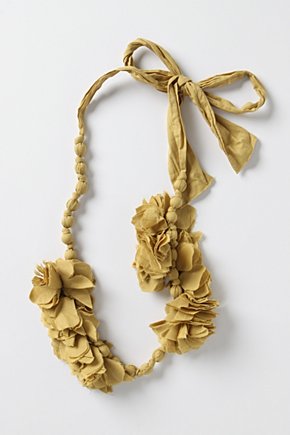
I thought it was a little too much ruffle for me so I decided to just do the ruffles on one side. And since I had some fabric left over from that grey sheet I thought I would just use that. Since grey is so in this season! Woohoo!
The length was perfect! Just cut a 2 inch wide strip down the length of the sheet and sew the two sides together to make a tube. ** Note to self and the rest of the world out there. Please sew a ribbon or string to one end on the inside so it will be easier to turn inside out. Not that I am speaking from experience or anything. An hour later.... (during which I was not struggling to turn it inside out ::ahem::) Pull some round beads out of your stash or pick some up at your local Michael's/Hobby Lobby/Joanne's. Depending on how long your want your necklace to be depends on the amount of beads you use. I had varying sizes that I put into my tube and then tied a knot in between each one. When I got to the length I liked, I stopped there.
You should have something that looks like this (please excuse the bad lighting, I do my crafting at night when the munchkins are asleep!):

Now for some flair! Instead of using the same material, I wanted to do a contrasting color. So I looked through my fabric stash and found a shirt that never quite fit me right. But it was a gorgeous purple, and purple and grey are perfect together. So I cut it up into little two inch circles. I'd cut 20 or so. But that really depends on how ruffle-y you want it. Don't worry about your circles being perfect... you won't be able to tell... trust me ;).
Fold the circles in half and then half again. Then take your needle and thread and sew it to a knot on the side of your necklace. Then go at it and make it as ruffle-y as you want.
Don't forget about your necklace ends! just turn them inside and sew them closed and your are ready to go. Go show off that fabulousness that you made with your own two hands.


I've realized that working with my hands in general is an inspiring thing. I was especially surprised at how exhilarating it was to saw wood by hand. Maybe the men are on to something? I felt so accomplished after sawing my wood down into squares for my wall tiles for the kid's room. I took great care to sand them and get them ready for a coat of paint and sealer. When you take great care in doing something, you know your heart is really in it. You're not careless, you take the time to notice every detail.
Well I'm not going to share the wall tiles with you quite yet. I'm going to save the big reveal for when they are up on the wall with my new gutter shelves. I can't wait!
So in the meantime I'll share with you a little piece I made myself recently based on an anthropologie necklace. I found the tutorial over at Flamingo Toes.
I had all the materials but I wanted to give it a little bit of my own twist too.
Here is the original necklace from Anthropologie:
I thought it was a little too much ruffle for me so I decided to just do the ruffles on one side. And since I had some fabric left over from that grey sheet I thought I would just use that. Since grey is so in this season! Woohoo!
The length was perfect! Just cut a 2 inch wide strip down the length of the sheet and sew the two sides together to make a tube. ** Note to self and the rest of the world out there. Please sew a ribbon or string to one end on the inside so it will be easier to turn inside out. Not that I am speaking from experience or anything. An hour later.... (during which I was not struggling to turn it inside out ::ahem::) Pull some round beads out of your stash or pick some up at your local Michael's/Hobby Lobby/Joanne's. Depending on how long your want your necklace to be depends on the amount of beads you use. I had varying sizes that I put into my tube and then tied a knot in between each one. When I got to the length I liked, I stopped there.
You should have something that looks like this (please excuse the bad lighting, I do my crafting at night when the munchkins are asleep!):

Now for some flair! Instead of using the same material, I wanted to do a contrasting color. So I looked through my fabric stash and found a shirt that never quite fit me right. But it was a gorgeous purple, and purple and grey are perfect together. So I cut it up into little two inch circles. I'd cut 20 or so. But that really depends on how ruffle-y you want it. Don't worry about your circles being perfect... you won't be able to tell... trust me ;).
Fold the circles in half and then half again. Then take your needle and thread and sew it to a knot on the side of your necklace. Then go at it and make it as ruffle-y as you want.
Don't forget about your necklace ends! just turn them inside and sew them closed and your are ready to go. Go show off that fabulousness that you made with your own two hands.


Monday, November 7, 2011
Projects in the making
Next up I'll share my experiences with the gutter book shelves, making large scrabble tiles as a cute kids room decoration and some hand-made ornaments for the holidays.
I may even throw in a giveaway :) Stick around, it's going to get interesting. Or crazy. Whichever comes first.
I may even throw in a giveaway :) Stick around, it's going to get interesting. Or crazy. Whichever comes first.
Mod Ruffle Wreath
And she made it look so easy so I had to try one of my own. Hers turned out a lot more cozy and wintery because she used wool but I used what I had on hand.
So I layed out a tired sheet that had been in our closet forever. It was a pretty grey, so I thought why not? I went to town cutting it into 2" strips. Silly me didn't remember to take photos until much later. I'll do better next time I promise.
I went to Lowe's earlier that day and picked up some pipe insulation for 1.20 cut it in half and ducked taped it into a circle.
Instant wreath base for only .60 :)
Whip out your hot glue gun and cover the entire wreath base by wrapping a fabric strip around it and hot glueing as you go.
Then go crazy twisting and looping to make ripples and ruffles and hot glueing them in place. I did two lines around the circumference but I kind of wish I would have done three. Use your discretion until you get the look you like. Next, cut a small strip to make a hanging loop and hot glue it to the back.
I really love grey and yellow together so I made a fabric rosette out of an old yellow t-shirt to add a little pizzaz.

but it wasn't quite finished. It just needed something... you artsy people out there know what I mean... that gut feeling that it needs a finishing touch.
Yes this wreath deserved a little something extra...

BAM. Ahhh there it is! An even BIGGER flower!
This sweet wreath is now proudly hanging on my front door. I just love the romantic look of it.
Wednesday, November 2, 2011
New Look!
I thought it was time to give this old blog a little facelift and some perky new colors. Hope you like it. Let me know what you think!
I just couldn't resist this design especially because of the subtle handwritten note on the side that says "I am thankful" :)
I am. I am so thankful for so many things. Now if I can just remember that on the days that the floor is covered in cheerios and little boys are catapulting themselves off my furniture.
Happy Wednesday!
Stay tuned, the next post I'll show off my new wreath and tell you about some more projects.
Friday, October 28, 2011
Crafty Experimenting

But no more! Carpe Diem people!
I can't believe that I've put something on the back-burner for so long that makes me so happy! And the kids are excited about the extra Lowe's trips and the chance to help mommy make something :)
Stay tuned for some crafty goodness :)
Tuesday, October 11, 2011
Lost
At 16 weeks we lost our baby.
No one should ever, ever have to go through something like this. I always considered myself so fortunate to have had such uneventful pregnancies and births and I feel even more so now.
I thank God that there is no question in my mind that I will see my angel again in heaven someday. I am sad that I was not able to watch my little one grow up and experience each new stage. I am definitely holding my little ones a little tighter and giving them that extra kiss at night not wanting to leave the room. They are so precious and life is so fragile.
I thank God that I was able to go through most everything at home. The hospital and dr. visits were horrible. So much so that I would tremble in the waiting rooms... the anxiety was awful. The day my ultrasound was clear, I was so happy I would not have to come back for a long time. I was planning a home birth this time and my treatment has solidified that choice.
The one visit I had with my midwife before this happened was one of the things that got me through. I was treated like a person and she asked the important questions to make sure I was taken care of on every level: emotional, mental and physical. Having children/creating life is so much more than a medical procedure for a woman. It affects us on every level of our being. It is a physical, spiritual, mental and emotional experience and we need to have all of those areas discussed and supported. And the midwife did just that.
We want to try again when we are ready.
It will take time to heal and it hurts to see a baby and feel sadness instead of awe and that welling up of motherly love that I would usually feel. I don't want to feel that way, but I do.
Everyday is new and I feel like I have a new perspective and a new drive. God has given us so much peace and protected us when we needed it most. We will carry this little one in our hearts forever and know we will see them again one day. Praying God is giving my little one lots of hugs and kisses for me.
Wednesday, August 24, 2011
Completely Happy :)

What a sweet little pumpkin, right? This is not a picture of anyone I know but how can you not immediately feel a connection with this little one. I actually came across it when doing research for a design. It's just so adorable it brought tears to my eyes.
Sappy I know.... but I guess it's all the hormones. Yep... I know what your thinking.... hormones? Well when your 13 weeks pregnant with your third, the hormones will get the best of you.
Yep, we're expecting baby number three in late February! This will definitely be my last pregnancy which is sad and exciting at the same time. Pregnancy is such an amazing experience but I look forward to watching my little ones grow and what the next phase of our life will be like. I feel complete and happy... maybe even completely happy? :)
Tuesday, July 5, 2011
Eight years
About eight years ago, Chad and I were dating and took a day trip up to Charlotte to hang out and check out what Charlotte was like. When I was in high school and trying to map out my life and decide where I would go to college. Charlotte was where I wanted to be. I had my eyes set on Winthrop University, which is right outside of Charlotte in Rock Hill, SC. They have a wonderful and challenging arts program there.
Charlotte was perfect. Not too far away but not too close either. Just right! Charlotte has been on my brain since I was 16 years old. It's crazy to even think about. And here we are, in the city that I dreamed about and then fell in love with when Chad and I visited here that spring 8 years ago. I decided to finish my degree at USCA but this was still where I wanted to be in the future. Do you think God calls you to a city? Puts that burning desire in you and that peace to know you are home?
I think so.
Charlotte has so much to offer. It has a great arts scene, tons of activities and places to go for kids, IKEA (Oh my goodness how could we live without IKEA being 15 minutes away?) LOL, diversity, sports, Lake Norman, etc.
I love the diversity - I've met people from Romania, Brazil, Africa, Italy, etc just in the six months of living here. It's so enriching to learn about other cultures. There is a sweet family that live two doors down from us. They are from Africa and have only been in the states for about 2 years. Our youngest are actually the same age... only two weeks apart! They were ministers in Somalia and started a church there. The kids play together and we have such a good time talking about parenting and what life is like in Africa.
I know God has so much in store for us here and I can't wait to see it all come together.
It took us eight years, but it's good to be home.
Saturday, June 25, 2011
Insert title here :)
I was thinking about the title of this post and I couldn't quite put my finger on the words to perfectly capture what I'm trying to say. A problem I'm all too familiar with. I can never fully explain myself, how I would like too. I guess I'm just too complex :) (my husband would be shaking his head yes right now LOL)
Through talking and sharing over the "girl's weekend," I realized there was a reoccurring theme. I have a running bucket list in my head. Through the whole weekend I ran across things that would spur me to say, "Yeah, one of my goals is ________" or "Yeah, that's something I want to do one day." I started to realize... I have a lot of those. The older I get the more I realize how much of a dreamer and visionary I am. And how a personality/spirit like that can be an amazing asset or a tragic stumbling block. It can cause you to not be content, which is something I've had to temper. In the past I've looked to the future and felt like I had to do this or that and then I would "make it" or be where I want to be.
I want to be right here, right now in this very moment. I'm content with most things in my life, but I still desire to experience and to learn. Which is the good part left over after the contentment is dealt with.
I think that is the creative nature in me. That is something I never want to temper. I get that from my dad... no, not that one... my heavenly father. God created me with a hunger to create and to experience his beauty and wonder through the world and with a little child-like curiosity sprinkled in to make it interesting :). I came across this amazing article about creativity and the Christian - it truly inspired me and reminded me that I do do my father's work. Check it out here.
I think a lot of personality traits can go either way depending on life experiences and if we choose listen to those mentors that God places in our path. If left to themselves, they can become negative but if tempered correctly it can be an amazing attribute. I'm trying to keep this in the front of my mind with the boys and encourage the beauty in their unique traits, like Corben wanting to take charge or to touch or question everything!!! Or Devlin being a go getter and wanting to see what something sounds like when you bang it on a hard surface (hence some of my favorite ceramic coasters broken!) or discovering whats in the very back of that drawer/bin/box. (insert bull in china shop here) LOL
They have some personality traits that if left to themselves could be seen as a bad thing but oh if tempered correctly watch out world for what my boys have to offer and what they dream to do and be. :) Corben's thirst to know how things work, understand people and to lead the way and Devlin's desire to explore and create new things combined with his kind heart… they will be great men someday, I just know it.
Friday, June 3, 2011
It only took us four years...
Last weekend was an adventure four years in the making. Four years ago to the exact weekend. "The girls" (My high school friends Jamie and Melissa) went on a bachelorette weekend to celebrate Melissa's upcoming nuptials. While we were out on the town, we met a group of ladies who had vacationed together every year since they graduated high school. They were all in there mid-to-late thirties. We were so impressed by that! They were from all across the US but once a year they put aside their crazy schedule and made their childhood girlfriends a priority. We wanted this for us too.
We've been through so much together and have stuck it out and loved each other in spite of some of it and through it all. Each of us is very different from the other and we like to poke fun and roll our eyes but when things get tight we come together like no other. They were there for the birth of both of my little sweet potatoes, have been there to pack or unpack for every single move, they are Aunt Jamie and Aunt "Sassa" to my boys and the list goes on.... These girls have been my sisters in life when I didn't have any. Growing up with three brothers makes you yearn for some sister-hood!
So that was our goal, every year, we would make a trip together. Well... two babies, being broke and moving around later. We finally did it! Friday morning we all set out to meet up in Charleston for a weekend of reconnecting, getting a little crazy, sharing some tears, and basking in the warm sun and new experiences. It was a blast!
Wednesday, February 9, 2011
Savvy Tips and Tricks
As most of you know if I can get away with making something at home rather than buying it, that's the route I am going to go. It's healthier, cheaper and just all around better for everybody. I was reading through some of my favorite blogs this morning and realized I have a lot of go-to things that I do that I have never shared before. So for those of you that are interested. Here is a little list of home-remedies/homemade things that I do on a regular basis:
1. Homemade vapor rub - The store bought stuff is not safe for little ones so I came up with my own about a year ago and everytime someone is congested or stuffy I make a small batch and rub, rub, rub! A lot of recipes call for beeswax etc. But I wanted to do something that I could just whip up with what I had on hand. So I use about 2 tablespoons of Olive Oil (great for your skin) and then 10 - 15 drops each of eucalyptus and peppermint oil. Avoid rubbing this on the face because of the peppermint oil. It will smell very potent but trust me, once you put it on it is not that strong. If it's in the middle of the night and they wake up stuffy I'll just put a few drops of Eucalyptus on a cloth diaper and put it in front of their fan. The whole room smells soothing and you'll see a great difference in their coughing. I even do it for myself too and put a cloth under my pillow. Sleep like a baby when I'm sick!
2. Homemade Apple Sauce - Ok organic applesauce is ridiculously expensive but I won't compromise on it because apples are one of the worst for pesticides, over 50 different pesticides are found on apples EEk! So I've found a way to do it for even cheaper than regular applesauce and it's pretty easy too. I keep a lookout for clearance organic apples at my local health food store. I can get apples for about 85 cents a pound. Not bad for organic apples. They just need to be eaten soon orrrrrrr made into applesauce :) So break out your apple slicer (love this thing! Saves my life on a regular basis... quick healthy snacks BAM) core/slice about 2 to 3 large apples and then chop them into chunks into your blender. That's right... don't peel them... trust me. Put them in with skin on... the skin has the most nutrients, why rob your applesauce of those nutrients? Add a little water and a tablespoon or so of lime juice (you could use lemon but I like lime... it's a little smoother). Blend until you get a smooth consistency, turn your blender off and then taste a little... YUM! Tastes like you are biting into a fresh apple and it's so sweet! No need for any sweeteners! Try it... you'll see. Put your applesauce in a clean empty applesauce jar and voila. And what do the taste testers say? "Mom I like this applesauce, it's yummy."
3. Another sick little one remedy - Garlic is a great natural antibiotic and honey is great to sooth a cough in a pinch. So why not grate up some garlic in some honey and give them a spoonful. Fresh garlic by itself is AWFUL. Yes I've tried it. Hey when you are sick and don't have time to be... you'll try anything!! But this way is not so bad, the honey covers the taste pretty well and it coats your throat.
That's all I've got for now. I'll think of more savvy ways to do things and share!
Tuesday, February 8, 2011
Preschool Beginnings: Making it fit your budget

Preschool is a very supply intense age. At least the way I like to do preschool :) Lots of crafts and hands-on activities. Tracing, sorting, counting - all these concepts could run you a pretty penny if you buy those supply sets out there but there are a lot of ways to cut down on the cost by just being a little creative.
One of my preschoolers favorite things to do is glue. There are lots of fun crafty things you can buy like pom-poms and googly eyes to make things super cute and fun but you can still make things fun with the basics. Their favorite so far is beans! They love glueing beans on their numbers of the week sheets. And after they glue their beans on their numbers we take the time to count the number of beans they put on their sheet. Number recognition and math with dry pinto beans :) If you want to add sorting to your activities then add in some black beans and have them separate the two types of beans. You can find lots of fun sensory activities to do with beans/rice etc on the web. Just google things you have on hand and the word "craft." You'll be amazed what people have come up with. I just scored 1000 colorful paper clips at target for 1.24 and I found some fun things we can make with them. Can't wait!
If you are a coupon-er like me don't forget to use your scraps! I keep a lot of my good scrap pieces of the print-out coupons I cut. The large pieces can be used to draw on and the other strips can be cut up and used to glue on your letter of the week sheets that you make on colored construction paper. Eco-friendly and budget friendly.
Play-dough is cheap to make and makes for hours of fun. I recently made a batch for the first time and love it!! It's perfect and has lasted for about a month. I'm right on the edge of having to make another batch. Use playdough to make shapes of things that start with your letter of the week. Get their imaginations going and see where it takes you. If you want a great recipe for playdough here is the one I used: Playdough tutorial
Hope that got your creative wheels going. I'll share more on my preschool adventures here and you can learn along with me! :)
Monday, February 7, 2011
Preschool Beginnings
Preschool is just ABC's and 123's right? When did it get complicated? Ok, I know it's probably me that's complicating things because, of course, I want to make sure I am "in the know" about every different way preschool can be taught. Did you know there are even different schools of thought on whether or not you should teach the alphabet in sequential order or should you teach capitals or lowercase first etc etc.
A few weeks back I decided it was time to get serious about doing a more structured preschool. Corben is three now and is ready to take on a little more structure. It helps him a lot to be engaged in different activities throughout the day. We have been doing a little bit of letters/counting throughout the past year but nothing really structured or consistent.
So I figured out a way to get myself into a routine and get organized about it. Accountability. You know that fascinating concept that God came up with to make sure we keep each other in check. Our friends live a few doors down from us and have two munchkins that are close in age with ours. Corben loves playing with his best friend Joe and Devlin is just enamored with little Jetta. So why not have a class and teach everybody? It would give Corben some classmates and give Lanie a little break throughout the week and a chance to get in some intense schoolwork with the older boys. So that's what I did. Twice a week my four students get together to have class from 10 AM - 1 PM.
I didn't really know what to expect at first. I was just going to go "all in" and see what happened. I was so surprised at how anxious they were to learn. Their little faces just lit up whenever we switched to a new activity. Wow! I thought it would be so hard to keep their attention but it's been great. I switch up activities often and make sure we have some free play in there too. So we can get all of those wiggles out.
I'm learning a lot and enjoying it! I like reading about all the different philosophies on education. Now the hard part is trying to decided which ones I think will be the most beneficial.
Here are some websites that I have enjoyed visiting so far. They have great hands-on ideas for little ones:
www.confessionsofahomeschooler.com
www.notimeforflashcards.com
http://lovemylifex4.blogspot.com
Enjoy!
Subscribe to:
Posts (Atom)