I've been experimenting with lots of different crafts lately. I'm trying to get a feel of what I really love to create. What really inspires me.
I've realized that working with my hands in general is an inspiring thing. I was especially surprised at how exhilarating it was to saw wood by hand. Maybe the men are on to something? I felt so accomplished after sawing my wood down into squares for my wall tiles for the kid's room. I took great care to sand them and get them ready for a coat of paint and sealer. When you take great care in doing something, you know your heart is really in it. You're not careless, you take the time to notice every detail.
Well I'm not going to share the wall tiles with you quite yet. I'm going to save the big reveal for when they are up on the wall with my new gutter shelves. I can't wait!
So in the meantime I'll share with you a little piece I made myself recently based on an anthropologie necklace. I found the tutorial over at
Flamingo Toes.
I had all the materials but I wanted to give it a little bit of my own twist too.
Here is the original necklace from Anthropologie:
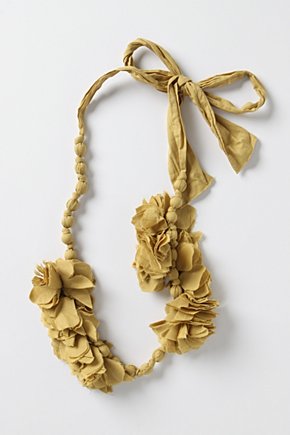
I thought it was a little too much ruffle for me so I decided to just do the ruffles on one side. And since I had some fabric left over from that grey sheet I thought I would just use that. Since grey is so in this season! Woohoo!
The length was perfect! Just cut a 2 inch wide strip down the length of the sheet and sew the two sides together to make a tube. ** Note to self and the rest of the world out there. Please sew a ribbon or string to one end on the inside so it will be easier to turn inside out. Not that I am speaking from experience or anything. An hour later.... (during which I was not struggling to turn it inside out ::ahem::) Pull some round beads out of your stash or pick some up at your local Michael's/Hobby Lobby/Joanne's. Depending on how long your want your necklace to be depends on the amount of beads you use. I had varying sizes that I put into my tube and then tied a knot in between each one. When I got to the length I liked, I stopped there.
You should have something that looks like this (please excuse the bad lighting, I do my crafting at night when the munchkins are asleep!):

Now for some flair! Instead of using the same material, I wanted to do a contrasting color. So I looked through my fabric stash and found a shirt that never quite fit me right. But it was a gorgeous purple, and purple and grey are perfect together. So I cut it up into little two inch circles. I'd cut 20 or so. But that really depends on how ruffle-y you want it. Don't worry about your circles being perfect... you won't be able to tell... trust me ;).
Fold the circles in half and then half again. Then take your needle and thread and sew it to a knot on the side of your necklace. Then go at it and make it as ruffle-y as you want.
Don't forget about your necklace ends! just turn them inside and sew them closed and your are ready to go. Go show off that fabulousness that you made with your own two hands.


