Tuesday, November 29, 2011

Pimp That *Trader Joe's* Bag


I heart Trader Joe's. Since moving close to one I can't keep myself out of there and at least drop $50 everytime I go in! It's my go-to place for organic produce at a great price and just yummy stuff in general.


I couldn't wait for them to do their Christmas bags again this year. Every year they have specially printed bags just for Christmas. I loved the design so much last year that I cut out some of the pictures and framed them for Christmas decorations. Well Trader Joe's was so kind this year and designed their bag to be cut out on purpose! Wasn't that so nice of them? They provided cut-outs for gift tags and a chain decoration!

But lets be honest if we just used them cut out, they would be kinda flimsy. So I decided to pimp my gift tags and give them a little more character and weight with crafty things I had around the house like card stock, yarn, beads, ribbon, embroidery thread, and glitter. If you have this in your arsenal already, you are all set!


First, I cut out the tags that Trader Joe's so nicely provided on their bag. But I didn't use their cut lines, I cut on the outside of them because I thought that would be a great template for some embroidery floss. Then glued them on some black cardstock and cut them back out. I thought they were very pretty with just this added step. So if your not real crafty, you could stop there if you wanted.

If you want a little more pizzaz then pull out your extras and go to town stitching on embroidery floss, using ribbon and yarn for the tag string, sewing on some beads and finishing it off with glitter.

Then here you have it! Some of my favorites:


Gift tags for pretty much nothing. Thanks Trader Joe's! I couldn't have done it without you!

Here's where I'm linking up this week.

Monday, November 28, 2011

New Reading Wall for My Boys


This whole thing started when I saw the awesome idea for gutter shelves on Gus & Lula.

I saw them on Oh Dee Oh a while back but never got around to it. Then the boys' books became such a headache. They were always all over the floor or in a bin or shelf and always getting pulled out or forgotten about because they were put away.

I cannot tell you how magical these shelves are to my children. They just love it! They love going to get books and they love putting them away again!


We read more because they are more accesible and they can clearly see which book they want to get and bring to me. I'm so glad I did this. They make me smile every time I walk into their room.

I fell in love with the bunting that Gus&Lula used and I just happened to have some Ikea fabric in the same print as their bedding lying around. So a little bias tape and a few cuts from my rotary cutter later... voila custom bunting for their room.

I enjoyed making these so much, I may just make some more and put them in my etsy shop. I just love this print, it's perfect for a little boys room.

Then last but not least... I was so inspired by these large scrabble wall tiles from Too Much Time On My Hands that I could not wait to make some of my own to decorate my boys' room with. And what better word to go over a book shelf?


I cut squares from some free wood scraps that I picked up from Home Depot and free-handed the letters while looking at a photo of scrabble tiles. They aren't perfect but I like that. It was made with love (and some time and sweat sprinkled in). So that's what I've been up to. How about you?

I have a new frugal tutorial coming. Hope to finish it before naptime is up!

Here's where I'm linking up this week.

Monday, November 21, 2011

Handmade For My Boy


 See what a great cardboard tube can do? I got the idea from a post on the crafty crow when I was researching ideas on what to do with all those fabric tubes I had laying around. But my husband was really the one the got excited and put it together with a little help from me. It was fun for us to make something together and see our little boys face light up when he woke up from his nap. And one of the first things he said was "Daddy can we make one for brother too?" Such a sweetie pie!


 My boy was also in need of a new scarf so I used the great tutorial over on living with punks as a guide with a few modifications to make it a bit smaller for a four-year-old. He said he wanted a green scarf with red polka dots. Does anyone else have an almost 4 year old that so specific about what he wants? :) So my mommy interpretation is below - green plaid with red buttons for fun. He loved it!


I'll be finishing up a new tutorial to share very soon and hopefully getting photos together of some of the other things I've been doing around the house. I've been a busy bee lately. What have you been working on?

Supplies On The Cheap


This weekend was pretty amazing. I scored some great deals on Saturday and then took the rest of the weekend to spoil my oldest with some handmade goodies.

Look at all that beautiful fabric! As I said on my last post, a fabric warehouse was doing a huge sale on fabric. The picture above is all of the fabric/crafty goodness I got that morning. 10 bolts of fabric and a yard of leather for $10 total!

My next stop was Joanne's. They were having a grand opening and they kept sending me coupons. I ended up having four 50% off one item coupons and they had sales on all the fabrics that I needed to too!

I spent $35 on $70 worth of stuff. And I finally got a rotary cutter! Wow! What was life like without this thing? It's awesome, especially because I cannot cut, much less draw, a straight line to save my life!

After getting all of my stuff home, I decided to store the fabric off the bolt. My dear husband helped me take it off and fold everything and after all was said and done we had a pile of really heavy duty cardboard tubes left over.... hmmmm. My wheels started turning and before you know it my husband joined in on making something with them! I've got more plans for them too.


It seemed like such a waste to throw them out! Especially when you are on a budget, crafty supplies are not priority - so you use what you have.

So next up I'll share all the spoiling that I did for my big boy this weekend. I love making things for my boys and he was all smiles :)

Thursday, November 17, 2011

Weekend Deals!

Photo by: cuttlefish via flickr
I am so excited about this weekend!

Not only is Chick-fil-A doing a free breakfast tomorrow but I have the chance to score some free bolts of fabric on Saturday! Yes FREE!

There is a warehouse getting rid of 8,000 bolts of fabric on Saturday and you can take home up to 3 bolts for free and most of the others are $1! For a whole bolt!

I can't tell you how fast I'm going to tie my shoelaces and run to this place on Saturday morning. Woohoo!
It's like early Black Friday for crafty people!

Then comes the icing on the cake. I know! I feel like a game show host... "and that's not all folks"...this weekend, the very first Joanne's Fabrics in Charlotte is having their grand opening! Ask me if I have 50% off coupons... go ahead ask :)

Can you tell I'm excited?

Over the next few days I'm completing my scrabble tiles and bookshelves in the boys room, sewing a brand new bag (momma's got a brand new BAG!... sorry I had to do it), and I'll share some of my fabulous frugal finds from this weekend.

Tuesday, November 15, 2011

3 Ways to Use Your French Press

It's no secret to those of you that know me that I have a love affair with my french press. Ok well... coffee in general. But my love of coffee was just the beginning of a long love affair and my transformation into a coffee snob... yes I admit it... when it comes to coffee I'm pretty snobby.

Growing up, my parents made coffee like you make tea. No not the process... it actually looked like tea... you could see through it. GASP! I know, I know. Those coffee snobs out there can pick themselves up off of the floor now. It's a sad past but I've come a long way.

Since those dark days, I now own an espresso machine and can froth with the best of those green apron adorned Starbucks baristas. If you want a challenge let me know :) But when I want a good ole dependable cup of coffee I turn to my French press.

As if I wasn't obsessed enough with coffee and all it's glorious processess, I soon found another fabulous concoction: Cold brew iced coffee.

Oh My! You can just imagine the money I've saved from doing my own espresso and iced coffee from home. I rarely patron the local Starbucks, unless I want that coveted "mommy break" that I talked about here.

So here's my quick list of how you can squeeze all the use out of that French press.

1. Delicious hot brewed coffee. Simple and straight forward and you get a wonderful tasting hot coffee every time. Tutorial here.

2. Cold Brew. After reading the tutorial on smitten kitchen on how to cold brew coffee, I thought - why don't I just let this sit in my french press overnight and I have a built in filter. Filter with a cheese cloth or paper towels? Nope... my french press will do it in no time. Then throw the container you poured the coffee in into the fridge and your good to go for several glasses of iced cold goodness.

3. Loose Leaf Hot Tea. I suppose you could do the bagged tea but loose is cheaper and better in my opinion. Just brew it the same way you do the hot coffee.

Who knew the French Press could be so versatile? Makes me fall in love with it even more. That's where you get me... I love it when something is pretty... but OH if it can be functional and versatile at the same time, I am completely in love! Maybe that's where my love affair with Apple came from too... I digress... Happy Tuesday!

Tip Junkie handmade projects

Great Minds Think Alike :)

As I was reading some of my favorite blogs this morning, I came across this new post from Too Much Time On My Hands.

Ha! I was actually just thinking about this as a possibility for expanding upon my paint swatch ornament idea. Why couldn't it be garland etc?

I think I'll take a crack at it and share what I come up with.

Great minds think alike huh? LOL

Monday, November 14, 2011

Paint Swatch Ornaments

So the secret is out. These cute and simple ornaments are made from paint swatches!

I love the weight and sturdiness that it gives and the added bonus is that it makes these pretty cheap to make. I was inspired by a magazine article that used scrapbook paper. You can use scrapbook paper if you want different patterns etc. But I like the simplicity and sturdiness of the paint swatch much better.

So let's get started... this is what you will need:

Use a 2" die cut circle punch to punch out 8 circles (4 of each color) from the swatches. Then fold them all in half with the wrong side out, just like this:


Now use your glue stick to glue the wrong sides together, alternating colors. make sure they are lined up correctly so the back of the swatch does not show at all. Then when you get to your last one, just glue it to the first one. You'll have a beautiful dome shape.


Take some pretty ribbon or string and thread it through. ** The ribbon is a little easier if you put it in the middle before you close the dome together. Tie a knot at the end and on the other side snip the length you want, fold it over and do a slip knot to create the loop you need to hang. You can stop there or go a little bit crazy and add a bow at the top or brush some white glue on the edges and sprinkle it with some glitter. Simple and beautiful. I can't wait to hang these on my tree this year!

So easy! Hope you enjoy making them with me!

Check out where I linked up on my where I like to party page!

Friday, November 11, 2011

Handmade ornaments


Yes it's that time again! ::sigh:: Christmas!

I always feel bad for Thanksgiving every year. It gets the shaft, but you have to prepare for December early right?

I saw an idea for this ornament while perusing the magazine section on a "mommy break." You know what I'm talking about. The time you get to go somewhere by yourself and listen to the beautiful sound of silence as you get to look at whatever you want without the interjections of "Please don't touch that, Stop bothering your brother, stay with mommy please, yes we will get a snack in a minute." And if you are feeling really crazy you'll buy yourself that expensive cup of coffee, not because it's expensive but because you just want to revel in the fact that SOMEONE ELSE served YOU!

Sorry... I'll put my daydreaming aside and get back to reality.

I saw these and I thought it would be a perfect project for the kids to do. So this is the first draft so to speak.

Since this one, they have gotten more intricate with bows and glitter and other little touches I came up with. But there is one more shocking secret to this cutie that I'll share with you next time. :) I love surprises. Next post I'll show you how to make these yourself for almost NOTHING :)

This year's goal is for almost all of our ornaments to be handmade. The kids love crafting so I can't wait to get them in on it! Happy Friday Everybody!

Wednesday, November 9, 2011

Anthropologie Necklace

I've been experimenting with lots of different crafts lately. I'm trying to get a feel of what I really love to create. What really inspires me.

I've realized that working with my hands in general is an inspiring thing. I was especially surprised at how exhilarating it was to saw wood by hand. Maybe the men are on to something? I felt so accomplished after sawing my wood down into squares for my wall tiles for the kid's room. I took great care to sand them and get them ready for a coat of paint and sealer. When you take great care in doing something, you know your heart is really in it. You're not careless, you take the time to notice every detail.

Well I'm not going to share the wall tiles with you quite yet. I'm going to save the big reveal for when they are up on the wall with my new gutter shelves. I can't wait!

So in the meantime I'll share with you a little piece I made myself recently based on an anthropologie necklace. I found the tutorial over at Flamingo Toes.

I had all the materials but I wanted to give it a little bit of my own twist too.

Here is the original necklace from Anthropologie:
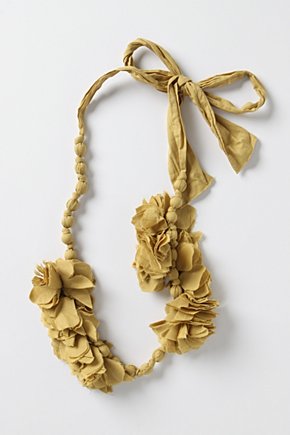

I thought it was a little too much ruffle for me so I decided to just do the ruffles on one side. And since I had some fabric left over from that grey sheet I thought I would just use that. Since grey is so in this season! Woohoo!

The length was perfect! Just cut a 2 inch wide strip down the length of the sheet and sew the two sides together to make a tube. ** Note to self and the rest of the world out there. Please sew a ribbon or string to one end on the inside so it will be easier to turn inside out. Not that I am speaking from experience or anything. An hour later.... (during which I was not struggling to turn it inside out ::ahem::) Pull some round beads out of your stash or pick some up at your local Michael's/Hobby Lobby/Joanne's. Depending on how long your want your necklace to be depends on the amount of beads you use. I had varying sizes that I put into my tube and then tied a knot in between each one. When I got to the length I liked, I stopped there.

You should have something that looks like this (please excuse the bad lighting, I do my crafting at night when the munchkins are asleep!):


Now for some flair! Instead of using the same material, I wanted to do a contrasting color. So I looked through my fabric stash and found a shirt that never quite fit me right. But it was a gorgeous purple, and purple and grey are perfect together. So I cut it up into little two inch circles. I'd cut 20 or so. But that really depends on how ruffle-y you want it. Don't worry about your circles being perfect... you won't be able to tell... trust me ;).

Fold the circles in half and then half again. Then take your needle and thread and sew it to a knot on the side of your necklace. Then go at it and make it as ruffle-y as you want.

Don't forget about your necklace ends! just turn them inside and sew them closed and your are ready to go. Go show off that fabulousness that you made with your own two hands.

Monday, November 7, 2011

Projects in the making

Next up I'll share my experiences with the gutter book shelves, making large scrabble tiles as a cute kids room decoration and some hand-made ornaments for the holidays.

I may even throw in a giveaway :) Stick around, it's going to get interesting. Or crazy. Whichever comes first.

Mod Ruffle Wreath


I just love the look of the wreath by Jones Design Co.

And she made it look so easy so I had to try one of my own. Hers turned out a lot more cozy and wintery because she used wool but I used what I had on hand.

So I layed out a tired sheet that had been in our closet forever. It was a pretty grey, so I thought why not? I went to town cutting it into 2" strips. Silly me didn't remember to take photos until much later. I'll do better next time I promise.

I went to Lowe's earlier that day and picked up some pipe insulation for 1.20 cut it in half and ducked taped it into a circle.

Instant wreath base for only .60 :)

Whip out your hot glue gun and cover the entire wreath base by wrapping a fabric strip around it and hot glueing as you go.

Then go crazy twisting and looping to make ripples and ruffles and hot glueing them in place. I did two lines around the circumference but I kind of wish I would have done three. Use your discretion until you get the look you like. Next, cut a small strip to make a hanging loop and hot glue it to the back.

I really love grey and yellow together so I made a fabric rosette out of an old yellow t-shirt to add a little pizzaz.


but it wasn't quite finished. It just needed something... you artsy people out there know what I mean... that gut feeling that it needs a finishing touch.

Yes this wreath deserved a little something extra...


BAM. Ahhh there it is! An even BIGGER flower!

This sweet wreath is now proudly hanging on my front door. I just love the romantic look of it.


Tip Junkie handmade projects

Wednesday, November 2, 2011

New Look!

I thought it was time to give this old blog a little facelift and some perky new colors. Hope you like it. Let me know what you think!

I just couldn't resist this design especially because of the subtle handwritten note on the side that says "I am thankful" :)

I am. I am so thankful for so many things. Now if I can just remember that on the days that the floor is covered in cheerios and little boys are catapulting themselves off my furniture.

Happy Wednesday!

Stay tuned, the next post I'll show off my new wreath and tell you about some more projects.
Related Posts Plugin for WordPress, Blogger...